If you manage a website, tracking user actions is important. You may want to know which buttons users click. You may also want to track form submissions, downloads, and purchases.
Traditionally, tracking these actions often required editing website code. Google Tag Manager (GTM) makes this process much easier.
With GTM, marketers can manage many tracking codes from one platform. You can create tags, define triggers, use variables, test implementations, and publish changes without editing every website page.
In this Google Tag Manager guide, we will cover everything beginners need to know. You will learn what GTM is, how it works, how to set it up, and what you can track with it.
What Is Google Tag Manager?
Google Tag Manager is a free tag management system from Google. It allows you to add and manage tracking codes and scripts on your website.
These tracking codes are commonly called tags.
For example, you may want to install Google Analytics tracking. You might also need Google Ads conversion tracking or a Meta Pixel.
Instead of manually adding every script to your website, you can manage many of them through GTM.
What Is a Tag Management System?
A tag management system helps businesses organize and control tracking scripts.
A website may use many marketing and analytics platforms. Each platform can require its own tracking code.
Managing these scripts manually can become difficult.
GTM provides a central location for managing them.
It also gives marketers tools for testing and controlling when tags should run.
Therefore, GTM is especially useful for digital marketers, SEO professionals, PPC specialists, and website owners.

Key Benefits of Google Tag Manager
Google Tag Manager offers several important benefits for website tracking.
Marketing Empowerment
GTM gives marketers more control over tracking implementations.
You do not always need to depend on developers for simple tracking changes.
For example, a marketer can create a button-click tracking tag. They can then test and publish the change through GTM.
However, advanced tracking may still require developer support.
No Manual Coding Required
One major advantage of GTM is reduced manual coding.
You can create many tracking implementations through the GTM interface.
For example, you can configure tags for:
- Google Analytics
- Google Ads
- Meta Pixel
- Conversion tracking
- Event tracking
However, GTM does not completely eliminate coding.
Advanced data-layer implementations may require JavaScript knowledge. Developers may also need to create custom website events.
Separate Loading
GTM loads its container script Separately.
This means the browser can continue processing other page resources while GTM loads.
This can help reduce blocking caused by tracking scripts.
However, adding too many tags can still affect performance. Good tag management is therefore important.
Error Reduction
Managing tracking scripts from one location can reduce implementation mistakes.
GTM also provides Preview Mode.
Preview Mode lets you test tags before publishing them.
Therefore, you can identify problems before users encounter them.
Improved Site Speed
GTM can help organize website tracking more efficiently.
Instead of placing many tracking scripts directly across website pages, you can manage them through a centralized container.
However, GTM itself does not automatically make every website faster.
Too many tags can still create performance issues.
Scalability
GTM becomes increasingly useful as your website grows.
A small website may need only a few tracking tags.
A larger website may need dozens of tags for analytics, advertising, forms, videos, and e-commerce.
GTM helps keep these implementations organized.
How Google Tag Manager Works
The basic GTM workflow looks like this:
Website → GTM Container → Tags + Triggers + Variables → Data Collection
GTM mainly works through three core components:
- Tags
- Triggers
- Variables
The Data Layer is another important concept for advanced tracking.
A simple example can explain the process.
Suppose you want to track a CTA button.
You create a tag that sends information to your analytics platform.
You create a trigger that detects the button click.
You use variables to identify the specific button.
When a visitor clicks the button, the trigger activates the tag.
The tag then sends the relevant information to the selected platform.
Core Components of Google Tag Manager
Tags
A tag is a piece of code or tracking configuration that performs an action.
For example, a tag can send an event to Google Analytics.
Another tag can send conversion information to an advertising platform.
JavaScript and HTML Snippets
Tags can contain different types of tracking code.
These may include:
- JavaScript
- HTML
- Third-party tracking scripts
- Custom code
GTM also provides templates for many common platforms.
Data Collection
Tags can collect information about user interactions.
For example, a tag can send information when someone:
- Clicks a button
- Submits a form
- Downloads a PDF
- Watches a video
- Completes a purchase
This information can then be sent to analytics or advertising platforms.
Third-Party Platform Integration
GTM supports integrations with many marketing and analytics platforms.
Common examples include:
- Google Analytics
- Google Ads
- Meta Pixel
- Microsoft Advertising
- Other third-party platforms
This makes GTM useful for managing multiple marketing technologies.
Triggers
A trigger determines when a tag should fire.
Think of a trigger as a rule.
For example:
Fire this tag when someone clicks the “Download Guide” button.
GTM checks the condition.
If the condition is true, the associated tag fires.
Firing Conditions
Triggers can respond to different actions.
Common examples include:
- Page views
- Clicks
- Form submissions
- Scrolls
- Video interactions
- Custom events
You can also create conditions based on URLs, page paths, click text, and other variables.
Event Listeners
GTM can detect many user interactions through event listeners.
For example, it can detect a button click.
It can then use that interaction to activate a trigger.
This allows marketers to track important user actions without manually adding tracking code to every element.
Blocking Triggers
Sometimes you do not want a tag to fire.
GTM allows you to create blocking conditions and exceptions.
For example, you may want a tag to fire on most pages but not on an internal testing page.
A blocking trigger can prevent the tag from firing under specific conditions.
Variables
Variables provide dynamic values to tags and triggers.
Think of a variable as a placeholder for information.
For example, a variable can contain:
- Page URL
- Click text
- Click URL
- Product price
- Transaction value
Dynamic Placeholders
Variables allow tags to use changing information.
Suppose users click different buttons.
Instead of creating a separate tag for every button, you can use variables to identify the clicked element.
This makes your GTM setup more flexible.
Built-in Variables
GTM includes many built-in variables.
Common examples include:
- Click URL
- Click Text
- Page URL
- Page Path
- Page Hostname
- Event
You can enable the variables you need from the Variables section.
User-Defined Variables
You can also create your own variables.
These are called user-defined variables.
For example, you might create variables for:
- Google Analytics measurement IDs
- Custom event values
- CSS selectors
- Product information
- Custom JavaScript values
Constants
Constant variables store values that do not normally change.
For example, you can store a measurement ID inside a constant variable.
You can then reuse that variable across multiple tags.
This makes your GTM setup easier to maintain.
Data Layer
The GTM data layer is an important concept for advanced tracking.
The data layer provides a structured way for your website to send information to Google Tag Manager.
For example, an e-commerce website may send product information through the data layer.
This information can include:
- Product name
- Product ID
- Product price
- Product category
- Transaction value
- User actions
JavaScript Array
The data layer is commonly represented using a JavaScript array called dataLayer.
A basic example looks like this:
dataLayer.push({
event: “purchase”,
transaction_id: “12345”,
value: 499
});
This information can then be accessed by GTM.
Information Storage
The data layer acts as a communication layer between your website and GTM.
Your website can push information into it.
GTM can then use that information for tags and triggers.
Dynamic Value Passing
The data layer becomes especially useful for dynamic websites.
For example, an online store can send different product prices and transaction values for every purchase.
GTM can capture these values and send them to analytics or advertising platforms.
How to Set Up Google Tag Manager
Now let’s look at the basic GTM setup process.
Create a Google Tag Manager Account
First, open Google Tag Manager and sign in with your Google account.
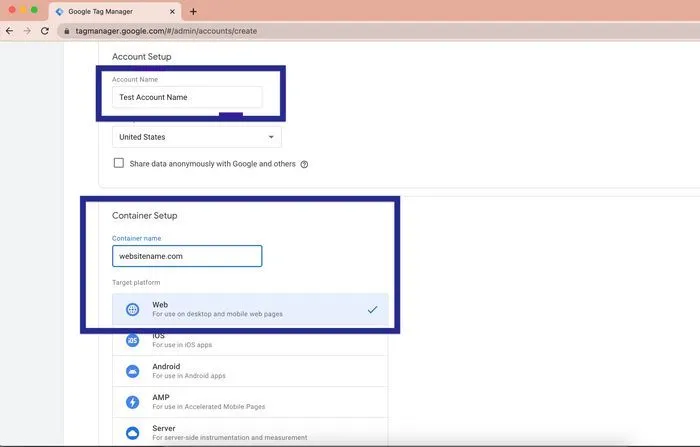
Then follow these steps:
- Create a GTM account.
- Enter your organization or business name.
- Select your country.
- Create a container.
- Select the appropriate target platform.
- Accept the required terms.
After creating the account, GTM will provide installation instructions.
Create a Container
A container holds your GTM tags, triggers, and variables.
Think of it as a workspace for your website’s tracking setup.
For a website, you normally create a web container.
Apps can use different container configurations.
If you manage multiple websites, each website generally needs its own appropriate container.
Find the GTM Container ID
Every GTM container has a unique ID.
It usually looks like this:
GTM-XXXXXXX
You can find this ID inside the GTM interface.
You will need it when checking your installation and troubleshooting tracking.
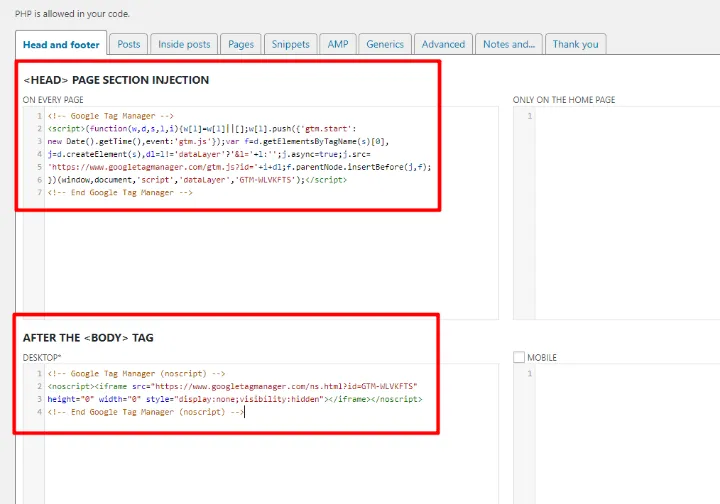
Add the GTM Head Snippet
After creating your container, Google provides installation code.
One part of this code needs to be added inside the website’s <head> section.
The exact installation method depends on your website platform.
For WordPress websites, you may use a suitable plugin or add the code through your theme or site configuration.
Add the GTM Body Snippet
GTM also provides a second code snippet.
This should generally be placed immediately after the opening <body> tag.
Both snippets are important for the standard GTM installation.
After installation, use GTM Preview Mode to verify that the container is loading correctly.
What Can You Track With Google Tag Manager?
One of GTM’s biggest advantages is its flexibility.
You can track many different user interactions.
Link & Button Clicks
You can track important clicks such as:
- CTA buttons
- Navigation links
- Download buttons
- External links
- Contact buttons
- WhatsApp links
For example, you could track how many visitors click a “Get Started” button.
Form Submissions
Forms are important conversion points.
You can track submissions from:
- Contact forms
- Lead forms
- Registration forms
- Newsletter forms
- Quote request forms
This can help marketers understand how visitors become leads.
Scroll Depth Tracking
Scroll tracking shows how far visitors move through a page.
Common tracking points include:
- 25%
- 50%
- 75%
- 90%
For example, if most users leave before reaching 50% of a blog post, you may need to improve the content structure.
File & PDF Downloads
GTM can track file downloads.
Examples include:
- PDF guides
- Brochures
- Reports
- eBooks
- Documents
This is especially useful for lead-generation websites.
Video Engagement
You can also track interactions with embedded videos.
For YouTube videos, you can track events such as:
- Video start
- Video progress
- Video completion
This helps marketers understand whether visitors actually engage with video content.
E-commerce Transactions
GTM can support advanced e-commerce tracking.
You can track actions such as:
- Product views
- Add to cart
- Checkout
- Purchases
- Revenue
E-commerce websites commonly use the data layer to send structured product and transaction information.
This information can then be passed to analytics and advertising platforms.
JavaScript Errors
GTM can also be used as part of a setup for tracking JavaScript-related errors.
Error tracking can help identify technical problems affecting users.
For advanced implementations, developers may need to create custom JavaScript or data-layer events.
Google Tag Manager Workflow for Marketers
A simple GTM workflow can make tracking implementation easier.
1. Identify Tracking Requirement
First, decide what you want to track.
For example:
Track clicks on the “Download PDF” button.
2. Create Tag
Create a tag that sends the required information to your analytics or marketing platform.
3. Create Trigger
Create a trigger that identifies when the action happens.
For example:
Fire when the PDF download link is clicked.
4. Configure Variables
Use variables to provide dynamic information.
For example, you can capture the clicked URL or button text.
5. Test in Preview Mode
Never publish tracking changes without testing them.
Use GTM’s Preview Mode to check whether your tags fire correctly.
6. Verify Data
Check your analytics or advertising platform.
Make sure the expected event or conversion is being received.
7. Publish Container
Once everything works correctly, publish the GTM container.
Your changes will then become active for website visitors.
8. Monitor Results
Tracking does not end after publishing.
Regularly check your analytics data.
Look for missing events, duplicate events, incorrect values, or unexpected tag firing.
Google Tag Manager Best Practices
A clean GTM setup becomes easier to manage over time.
Follow these best practices:
Use clear names:
Give tags, triggers, and variables descriptive names.
Test before publishing:
Always use Preview Mode before making changes live.
Avoid unnecessary tags:
Only install tracking that provides business value.
Use the data layer:
For advanced websites, use structured data-layer implementations.
Document changes:
Add useful descriptions and notes to important configurations.
Keep containers organized:
Remove unused tags and variables when appropriate.
Use versioning:
GTM versions make it easier to understand and manage published changes.
Check data regularly:
Make sure events and conversions are being recorded correctly.
Conclusion
Google Tag Manager (GTM) is a powerful tool for managing website tracking. It gives marketers greater control over tags and tracking implementations without requiring frequent code changes.
For beginners, the three most important GTM concepts are tags, triggers, and variables. Tags perform specific actions, such as sending data to Google Analytics. Triggers determine when those actions should happen, while variables provide the information that tags and triggers need to work properly.
As you become more familiar with GTM, the data layer becomes increasingly important. It helps pass useful information from your website to GTM and allows you to create more advanced tracking setups.
With proper testing, organization, and naming conventions, Google Tag Manager can make website tracking more flexible, efficient, and manageable.
