Old photographs and 8mm films are a valuable piece of history that captures precious memories. Over time, however, these treasures can become plagued by noise, which is a grainy or pixelated effect that detracts from the overall quality. Restoring an 8mm film while reducing noise involves a series of steps that can bring these cherished memories back to their former glory. This guide will explore the process of reducing noise in old photographs and 8mm films, providing valuable information for anyone looking to preserve their memories.
Key Takeaways
- Noise can detract from the overall quality of old photographs and 8mm films.
- Reducing noise can restore these cherished memories to their former glory.
- This guide will explore the process of reducing noise in old photographs and 8mm films.
Celebrity Story: Sunny Leone
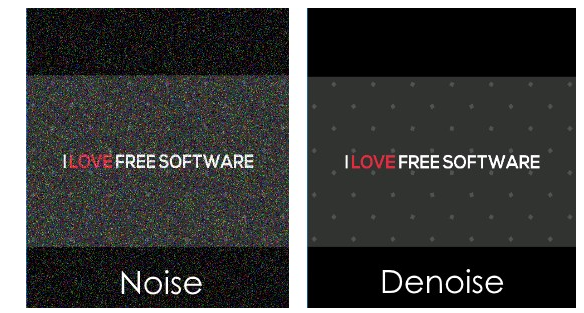
What Is Noise in Old Photographs and 8mm Films?
When we refer to noise in images, we’re talking about random variations in brightness and color that were not present in the original scene. In old photographs and 8mm films, this noise can be caused by a number of factors, such as low light conditions, improper handling, or the use of outdated technology.
Noise in photographs often appears as graininess or speckles, while in 8mm films it can manifest as flickering or lines across the frame. Understanding the type and severity of noise present in your images is crucial to selecting the appropriate noise reduction technique.
Celebrity Story: Lucy Paez
Types of Noise
There are two main types of noise that can appear in old photographs and 8mm films:
- Luminance Noise: This type of noise affects the brightness or luminance of the image. It often appears as graininess in photographs or flickering in films.
- Color Noise: This type of noise affects the color of the image. It often appears as speckles or splotches of color that were not present in the original scene.
Causes of Noise
Noise can be caused by a variety of factors, including:
- Low light conditions
- High ISO settings
- Poor quality film stock
- Improper handling or storage
- Outdated technology
Identifying the cause of noise in your images can help you prevent it from occurring in the future.
“Noise in images can be compared to static noise on a radio. It’s unwanted and can detract from the overall quality of the image.”
Celebrity Story: Madeline Argy
The Importance of Noise Reduction
Noise can significantly impact the quality of old photographs, 8mm films, and photoshoots, making them appear grainy, blurry, or distorted. The presence of noise can also distract from the intended focus and subject matter of the piece.
Reducing noise in old photographs and 8mm films is crucial for preserving cherished memories and ensuring that they can be enjoyed for generations to come. Additionally, noise reduction can enhance the overall visual quality of these historical pieces and bring out details that may have been previously hidden.
Evaluating Noise Levels in Old Photographs and 8mm Films
Before you can start reducing noise in your old photographs and 8mm films, you must first evaluate the level of noise present in them. This step is crucial so that you can determine which noise reduction techniques to apply and to what extent.
Here are three methods you can use to evaluate noise levels:
| Method | Description |
| Visual Inspection | Examine your photographs or films for visible noise – such as graininess, speckles, or color distortion. This method is subjective since it depends on your perception of what’s normal, but it’s a quick way to spot major issues. |
| Zooming In | Zoom in on your photographs or films to a high magnification level (such as 200% or 400%). This method will help you detect fine noise details that may be invisible to the naked eye. |
| Using Software Tools | Use specialized software such as Adobe Photoshop or Lightroom to measure noise levels. These tools provide a numeric value for the noise level, allowing you to quantify the amount of noise present. |
Keep in mind that noise levels can vary from one image or frame to another, even within the same roll of film or set of photographs. Therefore, it’s important to evaluate each one separately to ensure the best results.
Celebrity Story: Sara Saffari
Using the Histogram
Another useful tool to evaluate noise levels is the histogram. A histogram is a graph that shows the distribution of brightness levels in an image. It can help you identify areas of the image that are overexposed (too bright) or underexposed (too dark), as well as areas that contain noise.
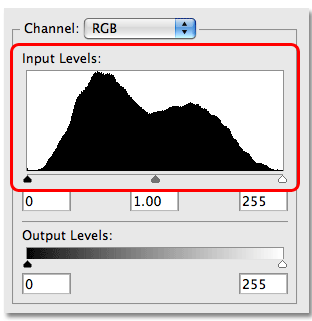
To view the histogram in Adobe Photoshop, go to the Windows menu and select the Histogram option. You can also use the Levels or Curves tools to adjust the brightness and contrast of the image to reduce noise and improve overall quality.
Once you’ve evaluated the noise levels in your old photographs and 8mm films, you can begin applying noise reduction techniques to restore your cherished memories.
Also read: Khenisha Chandran
Tools and Software for Noise Reduction
If you’re looking to reduce noise in your old photographs and 8mm films, you’ll need the right tools and software to get the job done. Here are some options to consider:
Noise Reduction Software
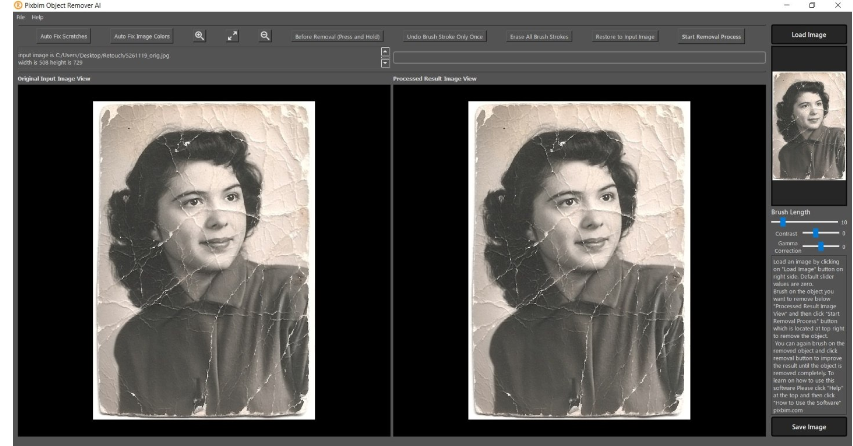
There are many software programs available that specialize in noise reduction, such as Adobe Lightroom, Topaz DeNoise, and DxO PhotoLab, which can help achieve the perfect beauty shot. These programs use advanced algorithms to analyze the image and reduce noise while preserving details.

Image Editors with Noise Reduction Features
Popular image editing software like Adobe Photoshop and GIMP also have built-in noise reduction features. These tools offer more manual control over the process and allow for greater customization.
VHS to DVD Converter Kits
If you’re looking to reduce noise in 8mm films, a VHS to DVD converter kit may be a good option. These kits usually come with software that includes noise reduction features specific to 8mm film. Some popular kits include Roxio Easy VHS to DVD and VIDBOX Video Conversion Suite.
Digital ICE Technology
Some scanners come equipped with Digital ICE technology, which automatically removes dust, scratches, and other imperfections while reducing noise. If you plan on scanning your old photographs or film, look for a scanner with this feature.
Online Noise Reduction Services
If you don’t have the software or skills to reduce noise yourself, there are online services available that can do it for you. Some popular options include Retouchup, Fix My Photos, and Restoration AI.
Whichever method you choose, make sure to experiment with different settings and techniques to find the best results for your specific photos or films.
Read Also: Fashion Designer in Bangalore
Preparing Old Photographs and 8mm Films for Noise Reduction
Before applying noise reduction techniques to your old photographs and 8mm films, it’s important to properly prepare them. Here are some tips:
- Clean your originals: Make sure your old photographs and film reels are free of dust, dirt, and fingerprints. Use a soft, lint-free cloth to gently wipe them clean. Consider investing in an anti-static brush or canned air to remove stubborn dirt or debris.
- Organize your collection: Catalog your photographs and films by date, location, and/or event to make it easier to find what you need. This will also help you keep track of which items you have already scanned or digitized.
- Digitize your originals: To reduce wear and tear on your old photographs and 8mm films, it’s a good idea to digitize them before applying any noise reduction techniques. This will also give you a backup copy in case anything happens to the originals.
- Scan at a high resolution: When scanning your photographs and film reels, make sure you do so at a high resolution. This will help you capture as much detail as possible, allowing you to better evaluate and reduce noise in the images.
- Use a film scanner for 8mm films: If you have 8mm films to digitize, it’s best to use a film scanner rather than a flatbed scanner. Film scanners are specifically designed to handle the unique characteristics of film, resulting in higher quality scans.
- Consider color correction: If your old photographs or 8mm films have faded or discolored over time, you may want to consider color correction before applying noise reduction techniques. This will help restore the images to their original vibrancy and clarity.
Manual Noise Reduction Techniques for Old Photographs
Manual noise reduction techniques can be a time-consuming process but yield excellent results for old photographs. Here are some techniques to consider:
- Clone Stamp Tool: This tool is used to copy pixels from one area of the photo to another, allowing you to remove noise. Simply select the clone stamp tool and hold down the Alt key to select a target area, then click and drag the cursor over the noisy area to replace it with the target area.

- Healing Brush: This technique is similar to the clone stamp tool but blends the pixels between the target and noisy area for a smoother finish. Select the healing brush tool, then hold down the Alt key to select a target area. Click and drag the cursor over the noisy area to replace it with the target area.

- Noise Reduction Filter: Many photo editing software programs have a noise reduction filter that can be applied to reduce noise in photographs. Use the filter sparingly to avoid losing detail in the image. Experiment with the settings to find the best result.


Remember to always work on a copy of the original photograph and save frequently to avoid losing progress.
For best results, consider a combination of manual and automated noise reduction techniques for old photographs.
Read more: Different Types of Models
Automated Noise Reduction Techniques for 8mm Films
If you have old 8mm films with a lot of noise, don’t worry – there are many automated noise reduction techniques available to help you bring your memories back to life. These techniques work by analyzing the noise patterns in your footage and reducing them to create a cleaner, clearer image. Here are some automated noise reduction techniques to consider:
Digital ICE
Digital ICE stands for Digital Image Correction and Enhancement. It is a technology that uses infrared light to identify and remove dust, scratches, and other imperfections from both film and prints. Digital ICE is an advanced feature found in some film scanners, and it can be a great option for removing noise from your 8mm films.
Neat Video
Neat Video is a plugin for popular video editing software that specializes in reducing noise in digital video. It uses advanced algorithms to analyze the noise in your footage and create a noise profile, which it then uses to reduce noise in your video. You can adjust the amount of noise reduction to achieve the desired level of clarity in your footage.
VideoDenoise
VideoDenoise is another plugin for popular video editing software that improves the quality of your video by reducing noise. It uses advanced
algorithms to analyze the noise in your footage and reduce it without losing detail. VideoDenoise also offers a range of presets for different types of footage, making it easy to get great results.
By using these automated noise reduction techniques, you can restore your old 8mm films to their former glory. However, keep in mind that automated techniques may not work perfectly for every type of footage, so it’s important to test each one to find the best solution for your specific needs.
Also read: Product Photography
Combining Manual and Automated Noise Reduction
While manual and automated noise reduction techniques both have their strengths and weaknesses, a combination of the two can provide even better results. Manual techniques, such as using the clone stamp tool to remove individual specks of noise, can be time-consuming but offer a high level of precision. Automated techniques, such as using noise reduction software, can be quicker but may not be as effective in removing specific types of noise.
By combining these techniques, you can quickly remove large areas of noise using automated software and then go in with manual techniques to refine the results and remove any remaining specks of noise. This approach can be particularly effective for old photographs and 8mm films that have a lot of noise and damage.
When using this approach, it’s important to work systematically and not to rush. Begin by using the automated software to remove as much noise as possible, then go in with manual techniques to refine the results. Repeat the process until you are satisfied with the results.
Retouching and Restoring Old Photographs and 8mm Films
After applying noise reduction techniques to your old photographs and 8mm films, it’s time for retouching and restoring them to their former glory. Here are some techniques to help you achieve this:
Fixing Scratches and Tears
Scan your old prints and films at a high resolution to detect scratches and tears. Use a photo editing software, like Adobe Photoshop, to remove these blemishes. Simply select the area around the scratch or tear, copy a nearby undamaged area, and paste it over the blemish.
For films, use the clone stamp tool to copy a similar frame and paste it over the damaged one. Check the results often to ensure consistency in terms of lighting and color.
Also Read: Maternity Shoots
Restoring Faded Colors
Old photographs and films, including Wedding Photos, tend to lose their original colors over time. Use a photo software to restore the colors by manually adjusting the brightness, contrast, hue, and saturation. Be cautious not to overdo it or you might end up with unnatural colors.

You can also use automatic color correction tools. Adobe Photoshop, for example, has tools like Auto Tone and Auto Contrast that can analyze and correct the color levels, making the images appear more vibrant.
Sharpening the Image
Noise reduction techniques can sometimes soften the edges of your photographs and films. To make them look clearer, sharpen the images using photo editing software tools like the Unsharp Mask filter or the High Pass filter.

Be mindful not to over-sharpen the images as this can result in unnatural and jagged lines or increase in noise, negating your previous efforts towards noise reduction.
Read also: Getting paid for Photography
Removing Unwanted Elements
There might be unwanted elements in your old photographs and films, such as dust, hair, or unwanted objects. Use the healing brush tool or the clone stamp tool to remove these elements. Zoom in closer and use a fine brush to ensure precision and accuracy.

For films, you can use editing software to remove unwanted frames or sections. However, be careful not to remove important parts of the film, such as the faces of family members or important events.
By following these retouching and restoring techniques, you can revive your old photographs and 8mm films and preserve your cherished memories for generations to come.
Preserving and Backing Up Your Restored Memories
After spending time and effort restoring your old photographs and 8mm films, it is essential to ensure that they stay safe and protected for years to come. Here are some tips for preserving and backing up your newly restored memories:
Make Digital Copies
One of the essential steps in preserving your restored memories is creating digital copies. This ensures that even if the original copies are damaged or lost, you still have a backup. Scan your restored photographs and convert 8mm films to digital format and save them on your computer or external hard drive.
Store in a Safe Place
Once you have your digital copies, store them in a safe and secure place. Consider using cloud-based services like Dropbox or Google Drive, which offer free and paid storage options. These services make it easy to access your restored memories from any device with an internet connection.
Use Quality Materials
When printing your restored photographs, use high-quality paper and ink. This ensures that your prints will last longer and look better. Store your prints in acid-free sleeves or albums to prevent damage from moisture or sunlight.
Read also: Fashion Modeling
Back Up Your Digital Copies
Backing up your digital copies is essential in case your computer or external hard drive fails. Make sure to create multiple backups and store them in different locations. Consider using a cloud-based backup service like Backblaze or Carbonite. These services automatically back up your data and ensure that your restored memories remain safe.
By following these tips, you can ensure that your restored old photographs and 8mm films will be around for years to come.
Sharing Your Restored Old Photographs and 8mm Films
After going through the process of reducing noise in your old photographs and 8mm films, you’ll likely want to share your newly restored memories with family and friends. Here are a few tips for doing so:
- Host a screening: Consider hosting a screening of your restored 8mm films for family and friends. You can make it a fun event by providing snacks and drinks, and taking a trip down memory lane together.
- Share online: You may also want to share your restored photographs and films online. Uploading them to a cloud-based storage service, such as Google Drive or Dropbox, can make it easy to share them with others.
- Create an album: Another option is to create an album of your restored photographs. You can then share the album with family and friends, either online or by printing physical copies.
- Make copies: It’s always a good idea to make multiple copies of your restored memories, whether it be on an external hard drive or by printing physical copies. This ensures that your cherished memories are preserved for years to come.
Whatever method you choose for sharing your restored old photographs and 8mm films, be sure to enjoy the process and cherish the memories you’ve restored.
Read More: How to be a Model
Tips for Preventing Future Noise Issues
While noise reduction can improve the quality of old photographs and 8mm films, preventing noise issues in the first place is always the best course of action. Here are some tips to help you preserve your memories without noise:
- Handle with Care: Avoid exposing your photographs and films to extreme temperatures, moisture, or direct sunlight. Keep them in a cool, dry, and dark place to prevent damage and fading.
- Make Copies: Create digital copies of your old photographs and 8mm films so that you have a backup in case the original gets damaged or lost. You can use online storage or external hard drives to store your copies.
- Use High-Quality Scanners: When digitizing your old photographs and 8mm films, use high-quality scanners and consider using professional services to ensure the best possible results.
- Avoid Overexposure: When taking new photographs, be mindful of overexposing the image, as it will cause noise. Adjust your camera settings or use filters to prevent overexposure.
- Keep Your Equipment Clean: Dust and dirt can cause noise when they accumulate on your camera lens or scanner. Keep your equipment clean and use a soft cloth to wipe off any smudges or fingerprints.
By following these tips, you can ensure that your future memories remain free of noise and deterioration.
Conclusion
Reducing noise in old photographs and 8mm films can be a time-consuming process, but the results are more than worth it. By following the tips and techniques outlined in this guide, you can restore cherished memories and preserve them for years to come. Remember to always prepare your photographs and films before applying noise reduction techniques and to use a combination of manual and automated methods for the best results.
Once your photographs and films are restored, it’s important to take steps to preserve them. Backing up your digital files and storing your physical copies in a cool, dry place can help ensure they remain in good condition.
Finally, don’t forget to share your restored photographs and films with family and friends to preserve their unique photographic style. These memories are meant to be enjoyed and shared, and by taking the time to restore them, you’ve ensured that they will be cherished for generations to come.
FAQ
Q: What is noise in old photographs and 8mm films?
A: Noise refers to random variations in brightness and color that can appear as grain, speckles, or artifacts in old photographs and 8mm films.
Q: Why is reducing noise important for old photographs and 8mm films?
A: Reducing noise is important for old photographs and 8mm films because it helps to restore the quality of the images or footage, enhancing the overall viewing experience.
Q: How do I evaluate the level of noise in my old photographs and 8mm films?
A: You can evaluate the level of noise in your old photographs and 8mm films by visually inspecting the images or footage and looking for any visible signs of noise, such as graininess or artifacts.
Q: What tools and software can I use to reduce noise in old photographs and 8mm films?
A: There are various tools and software options available for noise reduction in old photographs and 8mm films, including dedicated noise reduction software, image editing software, and film restoration software.
Q: How should I prepare my old photographs and 8mm films before applying noise reduction techniques?
A: Before applying noise reduction techniques, it is recommended to clean the photographs or films, remove any dust or debris, and make any necessary adjustments to brightness and contrast.
Q: What are some manual noise reduction techniques that can be used on old photographs?
A: Manual noise reduction techniques for old photographs include using clone or heal tools in image editing software, adjusting levels and curves, and applying localized noise reduction.
Q: Are there automated noise reduction techniques specifically for 8mm films?
A: Yes, there are automated noise reduction techniques specifically designed for 8mm films, such as using film restoration software that can automatically detect and reduce noise in the footage.
Q: What are the benefits of combining manual and automated noise reduction techniques?
A: Combining manual and automated noise reduction techniques can provide more precise control over the restoration process and help achieve the best possible results in reducing noise.
Q: How can I retouch and restore my old photographs and 8mm films after noise reduction?
A: After noise reduction, you can retouch and restore your old photographs and 8mm films by using techniques like retouching spots and scratches, adjusting color and tone, and repairing damaged areas.
Q: How important is it to preserve and back up my restored memories?
A: It is crucial to preserve and back up your restored memories to ensure their long-term preservation and prevent the loss of the newly restored images or footage.
Q: What are some suggestions for sharing my restored old photographs and 8mm films?
A: You can share your restored old photographs and 8mm films with family and friends by creating digital copies, creating a slideshow or video montage, or organizing a viewing party.
Q: How can I prevent future noise issues in old photographs and 8mm films?
A: To prevent future noise issues in old photographs and 8mm films, you can store them in proper archival conditions, handle them with care, and make digital backups to avoid further degradation.
Q: What are the key takeaways from this guide?
A: This guide provides an overview of noise reduction in old photographs and 8mm films, covering topics such as understanding noise, evaluating noise levels, manual and automated noise reduction techniques, and preserving and sharing restored memories.